Configure proxy on Nutanix CE
Recover MySQL root Password
Step # 2: Start the MySQL (mysqld) server/daemon process with the –skip-grant-tables option so that it will not prompt for password.Step # 1: Stop the MySQL server process.
Step # 1 : Stop mysql service
# /etc/init.d/mysql stopOutput:
Stopping MySQL database server: mysqld.
Step # 2: Start to MySQL server w/o password:
# mysqld_safe --skip-grant-tables &Output:
[1] 5988 Starting mysqld daemon with databases from /var/lib/mysql mysqld_safe[6025]: started
Step # 3: Connect to mysql server using mysql client:
# mysql -u rootOutput:
Welcome to the MySQL monitor. Commands end with ; or \g. Your MySQL connection id is 1 to server version: 4.1.15-Debian_1-log Type 'help;' or '\h' for help. Type '\c' to clear the buffer. mysql>
Step # 4: Setup new MySQL root user password
mysql> use mysql;
mysql> update user set password=PASSWORD("NEW-ROOT-PASSWORD") where User='root';
mysql> flush privileges;
mysql> quitStep # 5: Stop MySQL Server:
# /etc/init.d/mysql stopOutput:
Stopping MySQL database server: mysqld STOPPING server from pid file /var/run/mysqld/mysqld.pid mysqld_safe[6186]: ended [1]+ Done mysqld_safe --skip-grant-tables
Step # 6: Start MySQL server and test it
# /etc/init.d/mysql start
# mysql -u root -pIncrease RAM on nutanix ce
"
I setup nutanix community edition today in my homelab, and I was interested in looking at how to change both CVM vCPU and vRAM count. By default my CVM was running 4vcpu and 12GB of RAM, and I wanted to change this to 8vcpu and 15GB RAM (my CE whitebox is running a 8 core Atom CPU and 16GB RAM)
KVM is very new to me, so for my own documentation sake here are the steps I used.
SSH onto the KVM hypervisor using your favorite SSH client, in my case KVM was running on IP address 192.168.55.4, whilst the CVM was using 192.168.55.3
Logon using default nutanix KVM credentials of
Username: root
Password: nutanix/4u
First run virsh list to get the name of your Nutanix CVM, in my case it is NTNX-72c234e3-A-CVM
Next, run virsh dominfo NTNX-72c243e3-A-CVM to confirm number of CPU’s and RAM
To change the amount of RAM, in my case I increased from 12GB to 15GB, run the following commands and substitute the approriate CVM name
#Shutdown CVM
virsh shutdown NTNX-72c243e3-A-CVM
#Set vRAM (There should be two – -dashes before config)
virsh setmaxmem NTNX-72c243e3-A-CVM 15G – -config
virsh setmem NTNX-72c243e3-A-CVM 15G – -config
#start VM again
virsh start NTNX-72c243e3-A-CVM
To change the amount of CPU’s, edit the virsh XML file.
#edit virsh xml
virsh edit NTNX-72c243e3-A-CVM
This will open the VM XML file using vi editor, use the following commands to edit the file (I always forget how to edit in vi, so I will show the steps here for my own sake)
- Press “i” to enter insert mode
- Use the arrow keys to move to the following line
4 - Change the 4 to whatever you want, in my case I did 8
- Press “esc” to exit insert mode
- Type “:wq” to write out and save the file
virsh shutdown NTNX-72c243e3-A-CVM
#Start the Nutanix CVM again
virsh start NTNX-72c243e3-A-CVM
Run virsh dominfo again to confirm the changes were successful
virsh dominfo NTNX-72c243e3-A-CVM
In most cases with Nutanix CE, the defaults are 99% OK for most people. So test to see if it’s really required to increase or decrease CVM resources according to required workload and hardware specifications. In my case I saw no difference so I set the defaults back
"
Manage an HP Smart Array directly from VMware ESXi
"
In my lab I’m using a Proliant DL380 G5 filled with disk as a storage server, running some VSA on top of the volume I created and formatted with a vmfs filesystem.
I was running into performance issues, storage was performing poorly, and I needed to check for usual problems like for example cache battery status, since on a P400 raid card, write back is by default disabled if the battery has a low charge, thus lowering performances to a minimum.
My problem however was, I was running on top of this server all my iscsi shared storage, so it was not so easy to poweroff the server to open up the raid card Bios anche check. Also, every reboot cycle is really time consuming. So, since HP has always had management software for their raid controllers available for windows or linux, I went to check if there was some possibilities also for VMware ESXi.
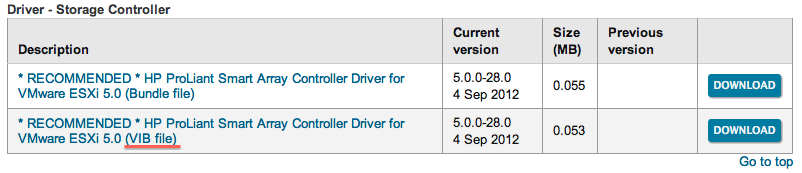
First, I checked on HP website and there was some promising download:
Look, a VIB file!
I downloaded it and installed in the usual way on my ESXi 5.1 server (even if the package is officially listed for ESXi 5.0…).
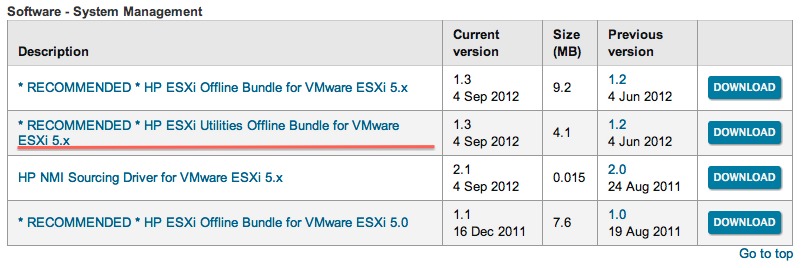
I also installed the utilities to manage the several HP components, since the first one was only the driver. If you want to install only the Raid utility, look for the hpacucli vib file.
And I finally reboot the server in order to complete the installation, hopefully for the last time…
After reboot, I checked the components were installed correctly:
From here, let the fun begin! There are many commands you can run on the raid controller by running /opt/hp/hpacucli/bin/hpacucli, I’m going to show you some of them:
First, I identified the controller. Remember is in slot 3, this will be needed in the next commands.
As I said, my problem seemed to be related to the cache battery, so I went to check its status:
The status seems to be ok, but I went to enable anyway the cache, the command is:
1 | ctrl slot=3 modify dwc=enable forced |
First, I identified the physical disks in the controller (pd), then I enabled the led on every single disk. This is the result
"
“Device eth0 does not seem to be present” error when we move or clone a CentOS 6.3 virtual machine in vSphere
"
When we move or clone a CentOS 6.3 Virtual machine made in vSphere5.5, and boot the machine once it is moved/cloned, we get the following error:
“Device eth0 does not seem to be present”.
This is due the fact that whenever we move or clone a Virtual machine, vSphere changes the MAC Address and CentOS renames the NIC from eth0 to eth1. CentOS stores the network interface hardware configuration using udev. The file is:
/etc/udev/rules.d/70-persistent-net.rules
Open this file in vi editor and delete the old entry for eth0 and edit the new entry for eth1 to eth0.
Then you need to edit the following file:
/etc/sysconfig/network-scripts/ifcfg-eth0
Record the HWADDR from the 70-persistent-net.rules configuration file and replace it with the existing HWADDR in ifcfg-eth0 configuration file.
Reboot the machine.
"
Configuring proxy on Nagios Linux CentOS
Problems Using Nagios XI With Proxies
We do not officially support Nagios XI when you install and use proxy software that restricts traffic to or from the Nagios XI server. There are several reasons for this. First, Nagios XI requires external access for package installation and updates. Package installation and updates may not work when proxies are used. Additionally, the Nagios XI code makes several internal HTTP calls to the local Nagios XI server to import configuration data, apply configuration changes, process AJAX requests, etc. These functions may not work properly when you deploy a proxy, which would result in a non-functional Nagios XI installation.There are two things that need to be configured to make XI installation work with a proxy; the yum and wget configurations. Do both of these before starting anything about the installation process.
In /etc/yum.conf :
proxy=http://someproxyserver:port/ # Shouldn't need to be quoted, remember the trailing slash proxy_username=myname # The username you authenticate to your proxy with, if applicable proxy_password=mypass # The password you provide to your proxy, if applicable
In /etc/wgetrc :
http_proxy=http://myname:mypass@someproxyserver:port/ # All in one string this time no_proxy=localhost,127.0.0.0/8,10.0.0.0/8,172.16.0.0/12,192.168.0.0/16 # Hosts to exclude from proxying
If you are using an https proxy:
https_proxy=https://myname:mypass@someproxyserver:port/Quoting is not needed (or helpful) in any of these, but if you have special characters in passwords (especially : or @) and are having problems you probably need to escape them with backslashes.
Linux open-vm-tools
curl: (1) Protocol 'http not supported or disabled in libcurl
Direct quote from source link
"
To test a REST API I’m building, I decided to use curl.
From the website:
“curl is a command line tool for transferring data with URL syntax, supporting DICT, FILE, FTP, FTPS, Gopher, HTTP, HTTPS, IMAP, IMAPS, LDAP, LDAPS, POP3, POP3S, RTMP, RTSP, SCP, SFTP, SMTP, SMTPS, Telnet and TFTP. curl supports SSL certificates, HTTP POST, HTTP PUT, FTP uploading, HTTP form based upload, proxies, cookies, user+password authentication (Basic, Digest, NTLM, Negotiate, kerberos...), file transfer resume, proxy tunneling and a busload of other useful tricks.”So after downloading the curl version for Windows, I opened a command prompt and browsed to the folder where I extracted the zip file.
I started with a simple command to invoke a PUT request to my API:
curl -XPUT 'http://localhost:9200/api/twittervnext/tweet'
Woops, first try and already an error:
curl: (1) Protocol 'http not supported or disabled in libcurl
The reason for this error is kind of stupid, Windows doesn’t like it when you are using single quotes for commands. So the correct command is:
curl –XPUT “http://localhost:9200/api/twittervnext/tweet”
"
Device eth0 does not seem to be present” error when we move or clone a CentOS 6.3 virtual machine in vSphere
When we move or clone a CentOS 6.3 Virtual machine made in vSphere5.5, and boot the machine once it is moved/cloned, we get the following error:
“Device eth0 does not seem to be present”.
This is due the fact that whenever we move or clone a Virtual machine, vSphere changes the MAC Address and CentOS renames the NIC from eth0 to eth1. CentOS stores the network interface hardware configuration using udev. The file is:
/etc/udev/rules.d/70-persistent-net.rules
Open this file in vi editor and delete the old entry for eth0 and edit the new entry for eth1 to eth0.
Then you need to edit the following file:
/etc/sysconfig/network-scripts/ifcfg-eth0
Record the HWADDR from the 70-persistent-net.rules configuration file and replace it with the existing HWADDR in ifcfg-eth0 configuration file.
Reboot the machine.
Aria2 download manager for Buffalo NAS LS-WVL
1. Existing Buffalo NAS version is 1.64Mod
Go to http://forum.buffalo.nas-central.org/ to update
2. Install Optware
| cd /tmp |
| wget |
| sh ./ls-mvkw-bootstrap_1.2-7_arm.xsh |
| mv /etc/init.d/optware /etc/init.d/rc.optware |
| ipkg update |
3. Install aria2
ipkg install aria2
4. Running aria2 (take note of the download location, adapt it to yours)
aria2c --event-poll=select --enable-rpc --rpc-listen-all=true --rpc-allow-origin-all --dir=/mnt/disk1/volume1/downloads --file-allocation=none -c -D
5. Running aria2 WEB UI
Go to https://github.com/ziahamza/webui-aria2 and download the zip file.
Open the index.thm file and configure it to your nas IP.
HowTo : Install VMware Tools on CentOS/RHEL
VMware Tools is a suite of utilities that enhances the performance of the virtual machine's guest operating system and improves management of the virtual machine.
Without VMware Tools installed in your guest operating system, guest performance lacks important functionality.
Installing VMware Tools
Open Vmware Worstation or ESX console and Locate the VM you need to install VMware Tools to.Right click the VM and choose "Tools", then select "Install VMware Tools".
It will connect the virtual CD-ROM device to the appropriate CD image containing the tools for your virtual machine.
Log into VMware Guest you need to install VMware Tools to.
Install the kernel-devel, gcc, dracut, make and perl packages using yum :
$ yum -y install kernel-devel gcc dracut make perl
Mount CD image with VMware Tools :
$ mkdir /mnt/cdrom
$ mount /dev/cdrom /mnt/cdrom
Copy the archive with VMware Tools to temporary directory :
$ cp /mnt/cdrom/VMwareTools-*.tar.gz /tmp
Uncompress the archive and run the installer :
$ tar -zxf /tmp/VMwareTools-*.tar.gz -C /tmp
$ /tmp/vmware-tools-distrib/vmware-install.pl --default
Remove temporary files :
$ rm -f /tmp/VMwareTools-*.tar.gz
$ rm -rf /tmp/vmware-tools-distrib
Validating VMware Tools Installation
Use the command as follows to validate that VMware Tools is running :$ initctl list | grep vmware-tools
vmware-tools start/running
To determine the vmware-tools version, run the command :
$ vmware-toolbox-cmd -v
How to collect IBM Dynamic System Analysis(DSA) logs for an ESXi server
It is possible to gather DSA data from an IBM server running ESXi without having to boot with a bootable CD or reboot the server at all.
From any machine, Windows or linux, you can run the latest release of the DSA tool, then reference the ESXi server using commandline parameters when running the DSA tool.
Step 1: Download the appropriate IBM DSA utility on any windows server that has connectivity to ESXi server.
Step 2: Open the command prompt and go to the directory where the DSA utility presents.
Step 3: Enter the below command to collect system information
#ibm_utl_dsa_dsyt85t-3.40_portable_windows_x86-64.exe --vmware-esxi user:password@ip-address
Note: this will take some time to gather diagnostics logs and store it in C: drive.
How to reset mysql root password
Source link2
C.5.4.1.1. Resetting the Root Password: Windows Systems
On Windows, use the following procedure to reset the password for all MySQL
root accounts:
- Log on to your system as Administrator.
-
Stop the MySQL server if it is running. For a server
that is running as a Windows service, go to the Services
manager: From the Start menu, select
Control Panel, then
Administrative Tools, then
Services. Find the MySQL
service in the list and stop it.
If your server is not running as a service, you may need to use the Task Manager to force it to stop. -
Create a text file containing the following statements.
Replace the password with the password that you want to
use.
UPDATE mysql.user SET Password=PASSWORD('MyNewPass') WHERE User='root'; FLUSH PRIVILEGES;Write theUPDATEandFLUSHstatements each on a single line. TheUPDATEstatement resets the password for allrootaccounts, and theFLUSHstatement tells the server to reload the grant tables into memory so that it notices the password change. -
Save the file. For this example, the file will be named
C:\mysql-init.txt. - Open a console window to get to the command prompt: From the Start menu, select Run, then enter cmd as the command to be run.
-
Start the MySQL server with the special
--init-fileoption (notice that the backslash in the option value is doubled):
C:\>
If you installed MySQL to a location other thanC:\mysql\bin\mysqld-nt --init-file=C:\\mysql-init.txtC:\mysql, adjust the command accordingly.
The server executes the contents of the file named by the--init-fileoption at startup, changing eachrootaccount password.
You can also add the--consoleoption to the command if you want server output to appear in the console window rather than in a log file.
If you installed MySQL using the MySQL Installation Wizard, you may need to specify a--defaults-fileoption:
C:\>
The appropriate"C:\Program Files\MySQL\MySQL Server 5.0\bin\mysqld-nt.exe"--defaults-file="C:\\Program Files\\MySQL\\MySQL Server 5.0\\my.ini"--init-file=C:\\mysql-init.txt--defaults-filesetting can be found using the Services Manager: From the Start menu, select Control Panel, then Administrative Tools, then Services. Find the MySQL service in the list, right-click it, and choose thePropertiesoption. ThePath to executablefield contains the--defaults-filesetting. -
After the server has started successfully, delete
C:\mysql-init.txt.
root using the new password. Stop the
MySQL server, then restart it in normal mode again. If you
run the server as a service, start it from the Windows
Services window. If you start the server manually, use
whatever command you normally use.
root accounts. The
instructions assume that you will start the server so that
it runs using the Unix login account that you normally use
for running the server. For example, if you run the server
using the mysql login account, you should
log in as mysql before using the
instructions. Alternatively, you can log in as
root, but in this case you
must start mysqld
with the --user=mysql option.
If you start the server as root without
using --user=mysql, the
server may create root-owned files in the
data directory, such as log files, and these may cause
permission-related problems for future server startups. If
that happens, you will need to either change the ownership
of the files to mysql or remove them.
-
Log on to your system as the Unix user that the
mysqld server runs as (for example,
mysql). -
Locate the
.pidfile that contains the server's process ID. The exact location and name of this file depend on your distribution, host name, and configuration. Common locations are/var/lib/mysql/,/var/run/mysqld/, and/usr/local/mysql/data/. Generally, the file name has an extension of.pidand begins with eithermysqldor your system's host name.
You can stop the MySQL server by sending a normalkill(notkill -9) to the mysqld process, using the path name of the.pidfile in the following command:
shell>
Use backticks (not forward quotation marks) with thekill `cat /mysql-data-directory/host_name.pid`catcommand. These cause the output ofcatto be substituted into thekillcommand. -
Create a text file containing the following statements.
Replace the password with the password that you want to
use.
UPDATE mysql.user SET Password=PASSWORD('MyNewPass') WHERE User='root'; FLUSH PRIVILEGES;Write theUPDATEandFLUSHstatements each on a single line. TheUPDATEstatement resets the password for allrootaccounts, and theFLUSHstatement tells the server to reload the grant tables into memory so that it notices the password change. -
Save the file. For this example, the file will be named
/home/me/mysql-init. The file contains the password, so it should not be saved where it can be read by other users. If you are not logged in asmysql(the user the server runs as), make sure that the file has permissions that permitmysqlto read it. -
Start the MySQL server with the special
--init-fileoption:
shell>
The server executes the contents of the file named by themysqld_safe --init-file=/home/me/mysql-init &--init-fileoption at startup, changing eachrootaccount password. -
After the server has started successfully, delete
/home/me/mysql-init.
root using the new password. Stop the
server and restart it normally.
Linux 2
Step 1: Stop MySQL daemon if it is currently runningDepending on the operating system MySQL is installed on, the daemon can be checked/stopped differently. Here is an example on how to do it in Unix-like systems.
[ NOTE ]: You might need to run it as a Unix System superuser (root) - depending on how the system is configured, and what permissions your Unix account is granted) |
ps -ef | grep mysql - checks if mysql/mysqld is one of the running processes. pkill mysqld - kills the daemon, if it is running. |
Step 2: Run MySQL safe daemon with skipping grant tables
mysqld_safe --skip-grant-tables & |
mysql -u root mysql
|
In MySQL command line prompt issue the following two commands:
UPDATE user SET password=PASSWORD("ualue=42") WHERE user="root"; FLUSH PRIVILEGES; |
Step 5: Stop MySQL safe daemon
Follow the first two steps, but this time kill (pkill) “mysqld_safe” instead of “mysqld”
Step 6: Start MySQL daemon
Depending on the operating system (Unix-like examples):
/etc/rc.d/rc.mysql start |
/etc/init.d/mysql start |
/etc/rc.5/mysql start |
Step 7: Root password is reset and ready to use
Password is reset. Privileges are flushed. Start MySQL and login as root with the password set in step 4:
mysql -u root -p mysql |
Nagios XI "NSP: Sorry Dave, I can't let you do that" Errors
Update the time manually.
Error:
NSP: Sorry Dave, I can't let you do that
Solution:
date MMDDhhmmCCYY
(where MM is month, DD is day, hh is hour, mm is minute, and CCYY is the year)
Reference acticles:
http://assets.nagios.com/downloads/nagiosxi/docs/Changing_The_XI_System_Time.pdf
http://support.nagios.com/wiki/index.php/Nagios_XI:FAQs#Resolving_.22NSP:_Sorry_Dave.2C_I_can.27t_let_you_do_that.22_Errors
Nagios XI SQL Error
Error:
SQL: SQL Error [ndoutils]:Table './nagios/nagios_servicestatus' is marked as crashed and should be repaired
Solution:
Reference articles
http://assets.nagios.com/downloads/nagiosxi/docs/Repairing_The_Nagios_XI_Database.pdf
Fix MBR after removing UBUNTU from Windows/Ubuntu Dual boot
After removing the Ubuntu partitions under Windows Disk Management, the OS will not be able to boot up. There is a need to fix the MBR (remove GRUB).
Get a Windows 7/8 bootable disk/flash drive, then choose repair option.
Go to Command Prompt and type the following:
bootrec/fixmbr
bootrec/fixboot
Then reboot your computer.
Done! That's how i remove ubuntu from my laptop. :-)
Or this alternative
- Download and burn the Super Grub Disk ISO to a CD.
- Boot from it.
- Select the
Choose Language & HELP :-))entry. - Select the English entry.
- Select the
Windowsentry. - Select the
Fix Boot of Windowsentry. - Reboot once the process is complete.
Source link
Putty CLI
This will auto run the command stated in the putty.txt file.
Dlink DSL-G604T Bittorent problem
"D-LINK (& Several other major routers, netgear, linksys, etc.) has a maximum connection threshold. There are several firmware upgrades for improved p2p performance and also some 3rd party firmware. Please google for it. However, if you don't trust these 3rd party firmware, there is a workaround.
This problem is extremely easy to identify. You utorrent downloads continue running, all connections continues. For example, a Internet explorer downloads continues with no problem. But "non-continuous" connections stops. You can't ping your router. Your MSN Disconnects. You can't use internet explorer to surf the web. Then this is most probably your problem.
PLEASE NOTE THE FOLLOWING IS TO BE USED ON D-LINK DSL-G604T ADSL ROUTERS ONLY. ALTHOUGH OTHER ROUTERS MAY CONTAIN SIMILAR OS, DIRECTORY STRUCTURE & TELNET COMMANDS. USE IT AT YOUR OWN RISK.
This post documents how to automate this process, and how to simplify the re-issuing of commands should it be necessary to reboot or restart the router.
The process is called Telnet Scripting. To use it you need:
- a Telnet Scripting tool
- a file containing Telnet commands (that is, a script file)
Although you can use a normal telnet. You will have to type the commands all over again everytime the router restarts. This includes changing firewall settings, virtual server settings, etc. With a telnet scripting tool, you can do it with 2 clicks.
The Telnet Scripting tool that I use is TST10.EXE, written by Albert Yale. It can be downloaded from at http://users.telenet.be/tontonzen/gg/TST10.zip
Here's a trivial example of its use, a script to login to the DSL-G604T and display the help text:
192.168.1.1 23
WAIT "login:"
SEND "root\m"
WAIT "Password:"
SEND "admin\m"
WAIT "#"
SEND "help\m"
WAIT "#"
The script assumes the default IP address of the router (192.168.1.1) and the default login password (admin).
If the script were stored in the file help.txt then the command to issue it (assuming it is in the same directory as TST10.EXE) would be:
tst10 /r:help.txt
Info on the script syntax and the parameters of TST10.EXE can be found by running the program.
If you like, you can also write a .bat file on your own to run the script so all you have to do is double click to execute the commands. That is what I did.
A real life example of where this is useful is given below. This provides a script to set the NAT session parameters for success (?) with P2P applications, by increasing the number of concurrent NAT sessions and setting appropriate timeout values to ensure 'stale' session data is discarded. Acknowledgement and thanks to a post by samPT in this forum for the values.
192.168.1.1 23
WAIT "login:"
SEND "root\m"
WAIT "Password:"
REM This password is the administrator password you have set.
SEND "admin\m"
WAIT "#"
SEND "cd /proc/sys/net/ipv4/netfilter\m"
WAIT "#"
SEND "echo 4096 > ip_conntrack_max\m"
WAIT "#"
SEND "echo 50 > ip_conntrack_generic_timeout\m"
WAIT "#"
SEND "echo 5 > ip_conntrack_tcp_timeout_close\m"
WAIT "#"
SEND "echo 120 > ip_conntrack_tcp_timeout_close_wait\m"
WAIT "#"
SEND "echo 1200 > ip_conntrack_tcp_timeout_established\m"
WAIT "#"
SEND "echo 120 > ip_conntrack_tcp_timeout_fin_wait\m"
WAIT "#"
SEND "echo 60 > ip_conntrack_tcp_timeout_time_wait\m"
WAIT "#"
SEND "echo 10 > ip_conntrack_udp_timeout\m"
WAIT "#"
SEND "cd /\m"
WAIT "#"
SEND "exit\m"
Save this in a file (say) nat_sessions.txt, edit the default IP address and password to match your installation. Run a command prompt, change to the directory with the script + program, and execute it with:
tst10 /r:nat_sessions.txt /m
Just to confirm that these commands have taken effect and that the values have been written to the specific files, change directory and type them out. Here's an example:
cd /proc/sys/net/ipv4/netfilter/
cat ip_conntrack_max
You can extend this Telnet Scripting technique to do as many things as your Linux knowledge and the embedded toolset in the DSL-G604T allows. Which means that you perhaps won't need to wait for new firmware releases and fixes. Clearly this won't cover everything, but I'm sure you get the idea...
"
How to run PHP 4 and PHP 5 at the same time on Apache for Windows
A great article for running both PHH4 and PHP5 at the same time. :)
"
Whilst the majority of web applications are hosted on Linux, most developers use Windows. Installing Apache, PHP, and MySQL on your Windows PC is recommended and has become much easier. However, few developers can test their pages in PHP 4 and PHP 5 on the same machine at the same time - but it is possible…
Environment overviewThis article will not describe every step in detail, but it should give you enough information to create your own multi-PHP web development environment:
- We’ll define the domains http://test/ and http://test4/. Both will navigate to the same php files located in C:\WebPages\
- PHP 5 will be installed as an Apache SAPI module and will be used for pages in the domain http://test/.
- PHP 4 will be installed as a CGI binary. PHP files will be executed using PHP 4 by changing the domain to http://test4/ or accessing via port 81, e.g. http://test:81/
Note that the latest versions of PHP 5 run very slowly if you use the CGI binary. Defining it as a module solves this issue.
Installation ingredients
The freeware/open source software you’ll need is:
- Apache HTTP server for Windows. Stick with version 2.0.x - although 2.2 is available, PHP doesn’t work with it yet.
- The latest PHP 4 and PHP 5 Windows binaries. Although installers are available, I’d recommend you download the ZIP packages.
- Optionally, a copy of the Windows MySQL database.
- A decent text editor - I recommend Notepad++.
Both Apache and MySQL provide Windows installers, so just run them. All going well, you should then be able to navigate to http://localhost/ in your browser.
Extract PHP 4 to C:\php\php4 and PHP 5 to C:\php\php5. Follow the instructions for configuring your php.ini file, but ignore the Apache setup details for now - we’ll cover that below. One setting that may catch you out is extension_dir - for PHP 5 use:extension_dir = "C:\php\php5\ext"
and for PHP 4 use:extension_dir = "C:\php\php4\extensions\"
You can now uncomment any extensions you wish to use, e.g. extension=php_mysql.dll in PHP 5’s php.ini.
Windows system setup
Now all the files are in place, we’ll define the local domains test and test4. This is done by editing the hosts file, located in %WINDOWS%/system32/drivers/etc. Add the following lines:127.0.0.1 test
127.0.0.1 test4
You can update your system using the command ‘nbtstat -R’, but you’ll need a reboot soon so don’t worry about it!
Now go to the Control Panel, open System, click the Advanced tab, and click Environment Variables. In the System variables section, click “Path” in the list followed by Edit. Add “;C:\php\php4;C:\php\php5″ to the end of the Variable value line.
Now reboot to make sure the settings are applied.
Configuring ApacheThe Apache configuration file is normally located at %PROGRAMS%\Apache Group\Apache2\conf\httpd.conf You’ll need to locate and edit the following settings.
Set the server to listen on port 80 (the default) and port 81:Listen 80
Listen 81
Ensure your root folder is set correctly (note the forward slash):DocumentRoot "C:/WebPages"
Add php files to the directory index, e.g.DirectoryIndex index.html index.php
Just before the Virtual Hosts section, define PHP 5 as a SAPI module:# PHP5 module
LoadModule php5_module “c:/php/php5/php5apache2.dll”
AddType application/x-httpd-php .php
PHPIniDir “C:/php/php5″
NameVirtualHost *:80
NameVirtualHost *:81
# localhost:80 - PHP5
<VirtualHost *:80>
DocumentRoot C:/WebPages
</VirtualHost>
# localhost:81 - PHP4
<VirtualHost *:81>
DocumentRoot C:/WebPages
ScriptAlias /php/ “c:/php/php4/”
Action application/x-httpd-php4 “/php/php.exe”
AddHandler application/x-httpd-php4 .php
</VirtualHost>
# test:80 - PHP5
<VirtualHost *:80>
ServerName test
DocumentRoot C:/WebPages
</VirtualHost>
# test:81 - PHP4
<VirtualHost *:81>
ServerName test
DocumentRoot C:/WebPages
ScriptAlias /php/ “c:/php/php4/”
Action application/x-httpd-php4 “/php/php.exe”
AddHandler application/x-httpd-php4 .php
</VirtualHost>
# test4:80 - PHP4
<VirtualHost *:80>
ServerName test4
DocumentRoot C:/WebPages
ScriptAlias /php/ “c:/php/php4/”
Action application/x-httpd-php4 “/php/php.exe”
AddHandler application/x-httpd-php4 .php
</VirtualHost>
# test4:81 - PHP4
<VirtualHost *:81>
ServerName test4
DocumentRoot C:/WebPages
ScriptAlias /php/ “c:/php/php4/”
Action application/x-httpd-php4 “/php/php.exe”
AddHandler application/x-httpd-php4 .php
</VirtualHost>
Testing your environment
Create a new file phpinfo.php in C:\WebPages\. Edit the file and add the line:<?php phpinfo(); ?>
Save it, then visit the following addresses in your browser:
- http://test/phpinfo.php - should show PHP 5
- http://test4/phpinfo.php - should show PHP 4
- http://test:81/phpinfo.php - should show PHP 4
Obviously, you can now define further virtual domains - perhaps one for every website you create. "