Getting Error Events from Multiple Event Logs

source link

Get-EventLog can read events only from one event log at a time. If you want to find events in multiple event logs, you can append array information, though:
$events = @(Get-EventLog -LogName System -EntryType Error)
$events += Get-EventLog -LogName Application -EntryType Error
$events
In these cases, it might be easier to use WMI in the first place - which can query any number of event logs at the same time.
This will get you the first 100 error events from the application and system log (cumulated, so if the first 100 errors are in the application log, no system log errors will be reported, of course):

Get-WmiObject -Class Win32_NTLogEvent -Filter 'Type="Error" and (LogFile="System" or LogFile="Application")' |
  Select-Object -First 100 -Property TimeGenerated, LogFile, EventCode, Message

When you replace Get-WmiObject with Get-CimInstance (which is new in PowerShell 3.0), then the cryptic WMI datetime format is automatically converted to normal date and times:

Get-CimInstance -Class Win32_NTLogEvent -Filter 'Type="Error" and (LogFile="System" or LogFile="Application")' |
  Select-Object -First 100 -Property TimeGenerated, LogFile, EventCode, Message

How to tell if you have Exchange 2003 Enterprise or Standard

source link
source link

1) Application Log - Use the event viewer on the Exchange server and analyze the Application Log.  If event id 1216 is reported when the Information Store comes online then you have Standard.  If 1217 is reported then you have enterprise.

2) System Manager - In Exchange System Manager, tree down to the “Servers” folder  and click the folder itself so your servers appear in the right pane.  This view should show 2 columns including an “Edition” column

Server Types & Versions

It has always been easy to indentify the service pack and build numbers of Exchange servers by examining the 'Servers' view in Exchange System Manager.
The Exchange System Manager supplied with Exchange 2003 now includes two more useful columns in this view:
Type - this column will show Basic, Front-end or Clustered.
Edition - this column will show Standard, Standard/Evaluation, Enterprise or Enterprise/Evaluation.
A sample screen shot is shown below. Here you'll see an Exchange 2003 server running the evaluation edition of Exchange 2003 Enterprise coexisting with an Exchange 5.5 server. It's worthwhile to note that Exchange 5.5 servers will always show as Standard even if they are running the Enterprise version of Exchange 5.5. The good news is that the columns are correctly filled in for Exchange 2000 servers.

How to find all users with Forwarding Address is set

Source Link

Exchange 2003:
In native Exchange 2003 you can do a custom search in Active Directory Users & Computers to find all users with forwarding address is set with some internal or external address.
(objectClass=*)(altrecipient=*)
Example: I have set a forwarding address for User 32 to forward all mails to User 31.

Now find it with Custom Search.
Active Directory Users & Computers -> Find -> Select Custom Search -> Enter (objectClass=*)(altrecipient=*) in LDAP Query Text Box -> Click Find Now.


Exchange 2007:
If Exchange 2007 is in native mode or co-existence with Exchange 2003 then you can use PowerShell to find the same thing.
Get-Mailbox | Where {$_.ForwardingAddress -ne $null} | Select Name, ForwardingAddress, DeliverToMailboxAndForward
Example: I have set a forwarding address for User 22 to forward all mails to User 21.


Now find it with PowerShell.

Note: PowerShell gives all users who are on Exchange 2007 as well as Exchange 2003. You can see the Exchange Version in below screen.


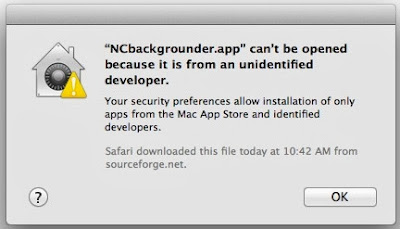
Fix the “App can’t be opened because it is from an unidentified developer” Error in Mac OS X

source

Since OS X Mountain Lion, the Mac defaults to preventing applications from unidentified developers or sources from being launched. You’ll discover the message in OS X 10.8 when you try to launch a Mac app that didn’t come from a verified source or from the Mac App Store, and you’ll get an alert dialog that says “[App name] can’t be opened because it is from an unidentified developer”.


This new security feature is called GateKeeper, and it doesn’t mean you can’t run those unverified apps on the Mac, you just have to either temporarily skirt the security blanket of GateKeeper, or turn off the app limitations entirely.

Temporarily Get Around “App Can’t Be Opened” Gatekeeper Alert Message

This is probably the best option for most users, since it maintains some security:
  1. Right-click (or control-click) the application in question and choose “Open”
  2. Click the “Open” button at the next dialog warning to launch the app anyway
You can do this with any third party app that gives you this warning dialog and open it anyway.


If you get tired of constantly right-clicking apps to open them, return to pre-Mountain Lion levels of app security by turning off Gatekeepers app verification completely.

Disable GateKeeper’s Unidentified App Developer Prevention Completely

This is generally best for advanced users who know what apps to trust and not to trust:
  1. Launch System Preferences from the Apple  menu
  2. Choose “Security & Privacy” and then click the “General” tab, followed by clicking the lock icon in the corner to unlock the settings
  3. Look for “Allow applications downloaded from:” and choose “Anywhere”
  4. Accept the security warning and allow
  5. You can now launch any app from any location or developer

Multiple "Desktop" Address Book databases on the BlackBerry smartphone

source link

Environment
  • BlackBerry Desktop Software
  • BlackBerry Enterprise Server
  • BlackBerry smartphones
  • Mac OS
  • Windows
Overview
On the BlackBerry smartphone there are two different Desktop address books. They are visible from Contacts > Options. Some contacts exist only on the BlackBerry smartphone and will not synchronize to the mailbox.

Cause
The primary Address Book is empty and blocks the synchronization process.

Resolution
To resolve this issue for Blackberry Desktop Software on a Windows computer, complete the following steps:
  1. Perform a full backup of the BlackBerry smartphone using BlackBerry Desktop Software.
  2. Wipe the BlackBerry smartphone data by following these steps:
    1. On BlackBerry smartphones running BlackBerry Device Software 4.0 through 5.0 go to Options > Security Options > General Settings, press the Menu key and select Wipe Handheld, and on BlackBerry smartphones running BlackBerry Device Software 6.0 through 7.1 go to Options > Security > General Settings.
    2. Type BlackBerry where prompted.
    3. Select Wipe Handheld or Wipe Data.
  3. Ensure the radio is not enabled. By default, the radio is disabled after performing a security wipe.
  4. Connect the BlackBerry smartphone to BlackBerry Desktop Software.
  5. When prompted, choose the the mail profile, which is linked to the Exchange mailbox of the BlackBerry smartphone user.
  6. Go to Backup and Restore > Advanced.
  7. Load the backup file that was created in step 1 by going to Options > Open.
  8. From the left side, select the Address Book - All database, and then click the arrow pointing to the right and allow the request.
  9. Close the Backup and Restore window and click Synchronize.
  10. Make sure Synchronize organizer data is selected.
  11. In the Synchronization Configuration window, choose to synchronize only the address book.
  12. Setup synchronization with the Exchange mailbox used to receive email.
    Note: Some entries may be duplicated. Duplicates should be deleted manually.
  13. Perform a wired synchronization process.
  14. When the synchronization process is complete, disconnect the BlackBerry smartphone.
  15. Wipe the device (see step 2).
  16. Set the Enterprise Activation password for the BlackBerry smartphone user.
  17. On BlackBerry smartphones running BlackBerry Device Software 4.0 through 5.0 go to Options > Advance Options > Enterprise Activation and on BlackBerry smartphones running BlackBerry Device Software 6.0 through 7.1 go to Options > Device > Advance System Settings > Enterprise Activation.
  18. Type the corresponding email address and the password.
  19. Let the BlackBerry smartphone activate.
  20. If necessary, restore any missing information from the full backup.
    Note: Restore only the missing databases, do not use full restore.
The wireless synchronization should proceed as expected and there should only be one Desktop contact list in Contacts > Options.
Note: If theBlackBerry Internet Service is used to receive personal emails, go to Options > Device Advance System Settings > Default Services and ensure that Desktop is set as default service for email, calendar and contact list.
To resolve this issue for Blackberry Desktop Software on a Mac computer, complete the following steps:
  1. Perform a full backup of the BlackBerry smartphone using BlackBerry Desktop Software.
  2. Wipe the BlackBerry smartphone data by following these steps:
    1. On BlackBerry smartphones running BlackBerry Device Software 4.0 through 5.0 go to Options > Security Options > General Settings, press the Menu key and select Wipe Handheld, and on BlackBerry smartphones running BlackBerry Device Software 6.0 through 7.1 go to Options > Security > General Settings.
    2. Type BlackBerry where prompted.
    3. Select Wipe Handheld or Wipe Data.
  3. Ensure the radio is not enabled. By default, the radio is disabled after performing a security wipe.
  4. Connect the BlackBerry smartphone to BlackBerry Desktop Software.
  5. Go to Restore.
  6. Select the backup file that was created in Step 1.
  7. Click Restore Selected data.
  8. Scroll down and select Address Book - All.
  9. Click Restore.
  10. Close the Backup and Restore window.
  11. Make sure that only the Address Book is selected for sync.
  12. Perform a wired synchronization process.
  13. When the synchronization process is complete, disconnect the BlackBerry smartphone.
  14. Wipe the device (see step 2).
  15. On BlackBerry smartphones running BlackBerry Device Software 4.0 through 5.0 go to Options > Advance Options > Enterprise Activation and on BlackBerry smartphones running BlackBerry Device Software 6.0 through 7.1 go to Options > Device > Advance System Settings > Enterprise Activation.
  16. Type the corresponding email address and the password.
  17. Let the BlackBerry smartphone activate.
  18. If necessary, restore any missing information from the full backup.
    Note: Restore only the missing databases, do not use full restore.
The wireless synchronization should proceed as expected and there should only be one Desktop contact list in Contacts > Options.
Note: If the BlackBerry Internet Service is used to receive personal emails, go to Options > Device Advance System Settings > Default Services and ensure that Desktop is set as default service for email, calendar and contact list.

"Operation could not be completed (error 0x00000709)" error when you use a CNAME record for a print server in Windows Server 2008 R2

Source Link

Symptoms
When you try to connect to a printer by using an alias (CNAME) resource record for a print server that is running Windows Server 2008 R2 or for a client computer that is running Windows 7 and that hosts a printer, you receive the following error message:
Windows couldn't connect to the printer. Check the printer name and try again. If this is a network printer, make sure that the printer is turned on, and that the printer address is correct.
Additionally, the following will be seen in a Network Monitor trace:
[client request] 34 4.421875  {MSRPC:9, SMB2:8, TCP:2, IPv4:1} IP addressIP address Winspool Winspool:RpcOpenPrinterEx Request, Printer = \\printsvr\Microsoft XPS Document Writer [server response] 37 4.843750  {MSRPC:9, SMB2:8, TCP:2, IPv4:1} IP addressIP address Winspool Winspool:RpcOpenPrinterEx Response, Status = ERROR_INVALID_PRINTER_NAME
Cause
This issue can occur because of optimization changes to the spooler code for non-clustered computers. When the operating system loads, the Print Spooler service loads the local name of the computer and the other local names that are in the DNS cache. The Print Spooler service uses the local names to service requests. Therefore, the service must gain access to the network and then query for names such as an alias (CNAME) resource record. This behavior decreases the performance of the service.
Workaround
To work around this issue, use the following command to add a registry key on the print server that is running Windows 2008 Server R2 and that is being accessed by an alias (CNAME) resource record:
reg add HKLM\SYSTEM\CurrentControlSet\Control\Print /v DnsOnWire /t REG_DWORD /d 1
Note This registry key decreases performance. Therefore, we recommend that you add this registry key on only the print servers that must be accessed by an alias (CNAME) resource record.

After modifying the registry entry, please restart the Print Spooler service for the entry to take effect.

More information
Load balancing printers by using a Network Load Balancing (NLB) technology or the Domain Name System (DNS) round robin feature is not supported. The workaround that is mentioned in this article is only for the scenario where one print server that is running Windows Server 2008 R2 is accessed by an alias (CNAME) resource record that refers to only that one server.

When the Mailbox Merge Program Tries to Open the Message Store, the Operation Is Unsuccessful

source link

Symptoms

If you use the Microsoft Exchange Mailbox Merge Program (Exmerge.exe) to export mailboxes to a personal folder (.pst) file or import mailboxes from a .pst file, the operation is unsuccessful, and the following error message appears in the Exmerge.log file:
Error opening message store (MSEMS). Verify that the Microsoft Exchange Information Store service is running and that you have the correct permissions to log on. (0x8004011d)

Resolution

To troubleshoot this issue, follow these steps:
  1. Verify that the user account under which you run the Exchange Mailbox Merge program has the Receive As and Send As security permissions set to Allow for the Mailbox Store. To do this, follow these steps:
    1. Start Exchange System Manager. To do this, click Start, point to Programs, point to Microsoft Exchange, and then click System Manager.
    2. Expand Servers, expand the server that you want, expand the storage group that you want (for example, expand First Storage Group), and then expand Mailbox Store.
    3. Right-click Mailbox Store, and then click Properties.
    4. Click the Security tab, and then click the user account whose permissions you want to verify.
    5. In the Permissions list, click to select the Receive As check box in the Allow column, click to select the Send As check box in the Allow column, and then click OK.
    6. If the user account is a member of a group (domain administrators or enterprise administrators), this group must also have send as and receive as rights to the mailbox store.
  2. Verify that the user account under which you run the Exchange Mailbox Merge program has delegation authority at the Organization level in Exchange System Manager. To do this, follow these steps:
    1. In Exchange System Manager, right-click the organization (for example, right-click First Organization (Exchange)), and then click Delegate control. The Exchange Administration Delegation Wizard starts.
    2. Click Next.
    3. If the user account under which you run the Exchange Mailbox Merge program is not listed in the Users and groups box, and if it does not have the role of Exchange Full Administrator, click Next, add this user account with the role of Exchange Full Administrator, and then click OK.
    4. Click Next, and then click Finish.
  3. Quit Exchange System Manager.
  4. Restart the Microsoft Internet Information Service (IIS) Admin Service. To do this, follow these steps.

    NOTE: This restarts the Exchange Information Store service.
    1. Click Start, click Run, type services.msc in the Open box, and then click OK.
    2. In the Name list, right-click IIS Admin Service, and then click Restart.
    3. Click Yes to confirm the restarting of the services.
    4. Quit the Services snap-in.

IBM BMC Remote Control

Below is an excellent articels on using IBM BMC

"
Looking on IBM’s website for how to perform basic Baseboard Management commands can be difficult at best. They tend to want you to be running Director or some management package to leverage the tool.
What if you just want to do the basics and keep it simple. Here’s the scoop.

Configure the BMC using the options available during the server boot processo manage the thing you’ll need to get the SMbridge tool (good search term, or use “System Management Bridge”). Presently, the the tool is available here.

Now here’s the tricky part, “How the hell do you take advantage of this newfound functionality?”. IBM won’t tell you. They’ll give you all the details on the RSA adapters…but low level BMC commands are tough to find. Here’s the deal. They are Avocent chips. Avocent calls them “OSA System Management Bridge” devices (another good search term). If you cannot find a current manual for the adapter, I’ve posted one here which includes a “Commands” section. They detail the commands that can be launched using the SMbridge tool provided by IBM.

A few examples of the SMbridge utility in use look like:

To gracefully power cycle a server:
smbridge -ip SERVERIPADDR -u BMCUSERNAME -p BMCPASSWORD power cycle

Get some basic server infosmbridge -ip SERVERIPADDR -u BMCUSERNAME -p BMCPASSWORD sysinfo

Get the serial number info:smbridge -ip SERVERIPADDR -u BMCUSERNAME -p BMCPASSWORD sysinfo fru

To hard bounce a server:smbridge -ip SERVERIPADDR -u BMCUSERNAME -p BMCPASSWORD power reset


Link source

Installing Windows 8.1 (or 8) without a product key

Using a USB stick installer allows you to start a clean 8.1 instal, but it won`t run because it did not accept my 8.0 OEM key.
I found a fix on this page:
http://www.jmedved.com/2013/09...or-8-without-a-product-key/
8.1 does not allow you to do a clean instal with a 8.0 key, but you can activate 8.1 with a 8.0 key once you are past that hurdle.
I recommend making a USB stick installer, then go to the sources folder, in there create a .txt file with notepad with the contents:
[EditionID]
Professional
[Channel]
Retail
[VL]
0
This is assuming you use the pro edition like me.
Next save that file as ei.cfg in the sources folder, this makes the installer skip the key check !
You can instal 8.1 without a key and when you are done it asks you to remove the USB stick, it reboots, and starts the OOBE.
This asks you for a key again but this time it DOES accept your 8.0 key and activates windows.
When you finally get a desktop you can check the system window, it will tell you Windows is activated.
The final problem is that this gave me a non-functional 300MB recovery partition created by the installation proces, that still did not allow me to use refresh/reset, still missing files.
The USB stick installer you create however does allow you to refresh/reset when plugged in, but this does not restore your recovery partition, but you can use the feature.
I also really wanted to have a usable recovery partition on my harddrive, turns out making one is really simple.
To do this create some unpartitioned space, I used 3200MB.
In this space create a 3200MB NTFS partition, and volume, I named it 8.1 recovery but any name will do, and do a quick format.
Next copy the contents of the ISO or the contents of your USB installer into that partition, it should leave about 87 MB free space.
You can remove the drive letter if you like, so you can`t accidentally modify the files easily.
Remove your USB stick or unmount the ISO and you fill find that the refresh/reset features now work :)

http://www.jmedved.com/2013/09/installing-windows-8-1-or-8-without-a-product-key/

ADB Push from Recovery

adb push rom.zip /data/media/0/

How Do I Install the Exchange 2010 Management Tools?

Question: How do I install the Exchange Server 2010 management tools on my workstation?
The Exchange Server 2010 management tools can be installed on a computer running one of the following operating systems:
  • Windows Vista 64-bit with Service Pack 2
  • Windows 7 64-bit
  • Windows Server 2008 64-bit with Service Pack 2
  • Windows Server 2008 R2
To install the Exchange 2010 management tools on your Windows 7 computer you first need to configure the pre-requisite components.
Open the Control Panel, click on Programs and then click on Turn Windows Features On or Off.  Enable the features shown here.


Enable Windows 7 features required for Exchange Server 2010 management tools
Download the Exchange Server 2010 SP1 installation files and extract them to a temporary folder on your computer.  From that folder launch Setup.exe.  If your computer is missing either the .NET Framework or Windows PowerShell pre-requisites there will be links for Step 1 and 2 to download and install them.

Install pre-requisites for Exchange Server 2010 SP1 on Windows 7
Otherwise click on Step 3 and choose Install only languages from the DVD.

Choose language options for installing Exchange Server 2010 SP1 on Windows 7
Next, click on Step 4 to begin the installation.

Begin installation of Exchange Server 2010 SP1 on Windows 7
Click Next at the introduction page, then accept the license agreement and click Next, then choose your preference for Error Reporting and click Next again.
At the Installation Type page choose Custom Exchange Server Installation, and also tick the box to Automatically install Windows Server roles and features required for Exchange Server and click Next.

Custom Exchange Server installation for installing management tools on Windows 7
Select the Management Tools role and click Next.

Installing the Management Tools role for Exchange 2010 on Windows 7
When the Readiness Checks have completed successfully click Install.

Begin installation of Exchange 2010 management tools on Windows 7
After the install has completed you can launch the Exchange Management Console from the Start -> All Programs -> Microsoft Exchange Server 2010 menu.

Source Link

View Mailbox Sizes for Exchange 2003 and Exchange 2010 through Powershell

If you need to view mailbox sizes for users in your Exchange organisation, you can do this from an Exchange Management Shell (EMS) for both Exchange 2003 and Exchange 2007/2010.


For your Exchange 2007/2010 users use the following command from EMS:

get-mailboxstatistics | fl displayname,totalitemsize

For your Exchange 2003 users use the following command from EMS:

Get-Wmiobject -namespace root\MicrosoftExchangeV2 -class exchange_mailbox -computer Ex2003ServerName | sort -desc size | select storageGroupName,StoreName,MailboxDisplayName,Size,TotalItems


Remote Access to ESXi Shell Using SSH

Remote Access to ESXi Shell Using SSH

If Secure Shell is enabled for the ESXi Shell, you can run shell commands by using a Secure Shell client such as SSH or PuTTY.
Enabling SSH for the ESXi Shell
By default, you cannot access the ESXi Shell using a Secure Shell client. You can enable SSH access from the direct console.

To enable SSH access in the direct console
1
At the direct console of the ESXi host, press F2 and provide credentials when prompted.
2
Scroll to Troubleshooting Options, and press Enter.
3
Select Enable SSH and press Enter once.
On the left, Enable SSH changes to Disable SSH. On the right, SSH is Disabled changes to SSH is Enabled.
4
Press Esc until you return to the main direct console screen.
You can enable remote command execution from the vSphere Client.

To enable SSH from the vSphere Client
1
Select the host and click the Configuration tab.
2
Click Security Profile in the Software panel.
3
In the Services section, click Properties.
4
Select SSH and click Options.
5
Change the SSH options.
To temporarily start or stop the service, click the Start or Stop button.
To enable SSH permanently, click Start and stop with host. The change takes effect the next time you reboot the host.
6
Click OK.
After you have enabled SSH, you can use an SSH client to log in to the ESXi Shell and run ESXi Shell commands.
Accessing the ESXi Shell with SSH
If SSH is enabled on your ESXi host, you can use an SSH client to run commands on that shell.

To access the ESXi Shell with SSH
1
Open an SSH client.
2
Specify the IP address or domain name of the ESXi host.
Precise directions vary depending on the SSH client you use. See vendor documentation and support.
3
Provide credentials when prompted.

How to check if the initial replication (DFSR) was completed successfully

This will guide you on how to check the DFS Replication (DFSR) status.

Event Viewer:
A separate event (4104) is thrown for each replicated folder on each downstream partner. For example, if there are three downstream partners with four replicated folders each then a total of 12 events will be thrown on all downstream partners.
Open the Event Viewer snap-in on the server, navigate to the DFSR event log, and then check the 4104 events for your replicated folders.


WMI:
You can also check the status of initial replication by running the following command on the downstream machine. This is especially handy if the event log has been cleared.

C:\Wmic /namespace:\\root\microsoftdfs path dfsrreplicatedfolderinfo get replicationgroupname,replicatedfoldername,state


ReplicatedFolderName  ReplicationGroupName  State DATA                  Test-RG               4

The state for each folder that has completed initial replication is 4. For all other folders that are still in the process of initial replication, the ‘State’ will be 2.


Source Link

Blank HP iLO Integrated Remote Console (IRC) page


Issue: After clicking the HP iLO Integrated Remote Console link, a blank page with a 'Close' button displayed only.


This is to ActiveX issue whereby it is trying to install an ActiveX cab file but due to access permission issue, it fails.


Solution 1) Open the browser as administrator. Click the HP iLO Integrated Remote Console link and install the ActiveX cab file when prompt.

Solution 2) Login as administrator. Click the HP iLO Integrated Remote Console link and install the ActiveX cab file when prompt.

Fix MBR after removing UBUNTU from Windows/Ubuntu Dual boot


After removing the Ubuntu partitions under Windows Disk Management, the OS will not be able to boot up. There is a need to fix the MBR (remove GRUB).


Get a Windows 7/8 bootable disk/flash drive, then choose repair option.
Go to Command Prompt and type the following:

bootrec/fixmbr
bootrec/fixboot

Then reboot your computer.

Done! That's how i remove ubuntu from my laptop. :-)


Or this alternative

  • Download and burn the Super Grub Disk ISO to a CD.
  • Boot from it.
  • Select the Choose Language & HELP :-)) entry.
  • Select the English entry.
  • Select the Windows entry.
  • Select the Fix Boot of Windows entry.
  • Reboot once the process is complete.

Source link

Get Top Memory Usage using Powershell


Here is a good powershell code that will output the top 5 memory usage and the user using it.

Code Snippets

get-wmiobject WIN32_PROCESS | Sort-Object -Property ws -Descending|select -first 5|Select processname, @{Name="Mem Usage(MB)";Expression={[math]::round($_.ws / 1mb)}},@{Name="ProcessID";Expression={[String]$_.ProcessID}},@{Name="UserID";Expression={$_.getowner().user}}

How To Install Windows 8 From a USB Device

Instructions on Using a USB Flash Drive To Install Windows 8 by Tim Fisher

Source Link

Requirements:
  • A flash drive (4 GB or more)
  • A Windows 8 DVD or Windows 8 ISO file
  • Access to a working computer, with a DVD drive if you have a Windows 8 DVD, with Windows 8, Windows 7, Windows Vista, or Windows XP installed
Important: If you have a Windows 8 ISO file and want that on a flash drive, start with Step 2. If you have a Windows 8 DVD and need that on the flash drive, start with Step 1.

Here's How:

  1. Create an ISO file from the Windows 8 DVD. This is the procedure by which you create a single file, called an ISO image, that contains all the data stored on the Windows 8 setup DVD disc.

    Once you have an ISO image created from your Windows 8 disc, come back here and continue on with this tutorial which will explain how to get that ISO file onto a flash drive.

    Note: If you already know how to create ISO files with your favorite program, often called "ripping," then do so in whatever way you're used to doing it. However, if you've never created an ISO image, or don't have a program installed right now that does it, please see the linked tutorial above for complete instructions on doing so with a free program.
  2. Download the Windows 7 USB/DVD Download Tool from Microsoft and then install it.

    This free program from Microsoft properly formats your flash drive and then copies the contents of the Windows 8 installation ISO file you have to that flash drive.

    Note: Don't worry that this program has Windows 7 in the title. This program works perfectly well with Windows 8 ISO files and can be installed in Windows 8, Windows 7, Windows Vista, or Windows XP.
  3. Start the Windows 7 USB DVD Download Tool program. You should be able to find the shortcut on the Desktop, as well as in your Start menu or on your Start screen, depending on which version of Windows you installed the program on.
  4. Click Browse on the Step 1 of 4: Choose ISO file screen.
  5. Locate, and then select, your Windows 8 ISO file. Then click or touch Open.

    Note: If you downloaded Windows 8 from Microsoft, check your Downloads folder or your Desktop for the ISO image. If you created an ISO image from your Windows 8 DVD, the ISO file will be wherever you created it to.
  6. Click or touch Next.
  7. Choose USB device on the Step 2 of 4: Choose media type screen.

    Note: As you can see here, there is also a DVD option. While it doesn't do us much good in this case, since the end game is to get Windows 8's setup files on a flash drive, you could also use this tool to burn a Windows 8 ISO image to a DVD or BD disc.
  8. On the Step 3 of 4: Insert USB device screen, choose from the drop-down box the flash drive or USB-connected external hard drive you want to put the Windows 8 setup files onto and then touch or click Begin copying.

    Tip: If you haven't yet plugged in the USB storage device you're planning on using, you can do that now and then touch or click the blue refresh button to make it show up in the list.
  9. Click or touch Erase USB Device if you're prompted to do so on a Not Enough Free Space window. If you don't see this, don't worry, it just means that your flash drive or external hard disk is already empty.

    Important: If this message didn't make it apparent, you should know that whatever data you might have on this drive is going to be erased as part of the process of getting the Windows 8 setup files copied.
  10. On Step 4 of 4: Creating bootable USB device, just wait for the Windows 7 USB DVD Download Tool to prepare the drive and copy the Windows 8 installation files to it.

    The first Status you see will be Formatting, which will take anywhere from a few to several seconds, depending on how large the USB drive is that you're using. Next will be Copying files which could take anywhere from 15 to 30 minutes, possibly longer, depending on which Windows 8 ISO file you're working from, as well as on how fast your flash drive, USB connection, and computer is.

    Tip: Don't worry if the percentage indicator jumps ahead quickly but then sits on a single number for a very long time. While it might not make a lot of sense to behave that way, it doesn't necessarily mean anything is wrong.
  11. Assuming everything went as planned, the next screen should say Bootable USB device created successfully with a Status that says Backup completed.

    You can now close the Windows 7 USB DVD Download Tool program window. The flash drive, or other external USB drive you're using, now has the necessary files on it to install Windows 8 and is also properly configured to be booted from.
  12. Boot from the USB device that you just created to start the Windows 8 install process.

    Tip: If the Windows 8 setup process doesn't start, it's very likely that you'll need to make boot order changes in the BIOS. See How To Change the Boot Order in BIOS if you need help doing that.

    Tip: If you have a UEFI based system and you still can't boot Windows 8 Setup from the flash drive, even after setting the USB device first in the boot order, see Tip #1 below for help.

    Note: If you came here from my How To Clean Install Windows 8 tutorial, you can return there now to continue the walkthrough of that process.

Tips:

  1. The Windows 7 USB DVD Download Tool formats the USB drive as NTFS, a file system that many UEFI based computers will not boot from when on a USB drive.

    To work around this issue, you'll need to copy the data off the flash drive, reformat the flash drive using the older FAT32 file system, and then copy the data back onto it.

SanDisk Flash Drive NOT detected by the Windows PC

 
Why did my Windows computer stop detecting my SanDisk USB flash drive?
Advanced Troubleshooting
Note: This article is advanced troubleshooting for a rare condition wherein a flash drive stops getting recognized on a Windows computer, but is still working on other computers. Please reference the following articles first before attempting the instructions in this article.
A corrupt registry entry could cause your SanDisk product to not be detected by the computer. Removing the registry keys created on installation of your SanDisk product will allow the computer to fully reinstall the device and may resolve the issue.

STEP 1 - Backup the registry
1. Unplug the device from the USB port.
2. Run regedit.
Windows XP: Go to Start > Run, type in regedit and then click OK.
Windows 7, 8 and Vista: Click the Start button, type regedit in the search box, and then press Enter.

3. From the registry menu, choose File > Export.
4. Name the file SNDK.reg and save it to your desktop.


STEP 2 - Remove SanDisk info from the registry

WARNING: DO NOT delete any registry key other than keys that include VID_0781. Deleting registry keys other than keys that include VID_0781 MAY cause your computer to not boot properly.

1. From the registry menu, click Edit and choose Find.
2. Type in VID_0781 and click Find Next.
3. Once the search finishes, right-click the highlighted registry key and select delete.
4. Press the F3 key to find the next registry key that includes VID_0781.
5. Right-click the highlighted registry key and select delete.
6. Repeat this process until the search returns with No results Found.

NOTE: Under Windows 7, 8 and Vista, some registry keys may be protected and cannot be deleted. Simply skip over these keys if you receive a message that the key cannot be deleted.


7. Once all registry keys containing VID_0781 have been deleted, reboot your computer.
8. Plug the device into the computer after it's finished rebooting.

Putty CLI

putty.exe -ssh userid@hostname -pw password -m c:\temp\putty.txt

This will auto run the command stated in the putty.txt file.