DFS replication service stopped replication on the replicated folder at local path

 
event log discription:
 "The DFS replication service stopped replication on the replicated folder at local path ... "

The following article presents how have I bypassed the above issues thanks to the articles on Technet and one of the Internet blogs. I have also included some of my own augmentations into the provided solutions. Hope you'll find those information useful and consolidated. 

How to fix the issue


Following the instructions on Technet:
1) Stop and disable DFS Replication service.
2) Go into the drive containing replicated folder and make sure that the following folder options are set as follows:
  • Show hidden files, folders, and drives - ENABLED
  • Hide protected operating system files (Recommended) - DISABLED
3) On the Security tab of System Volume Information folder Properties add the user that you're currently logged in with Full Control permissions and the scope of This folder only.
4) Go into System Volume Information folder and on the Security tab of DFSR folder Properties add the user that you're currently logged in with Full Control permission and the scope of This folder, subfolders and files. Make sure that permissions get propated to all child items of the folder.
5) Remove the DFSR folder. If the above results in the Source Path Too Long error like it's shown on the following screenshot:
perform the following steps (thanks to this blog):
  • create TEMP folder in the C drive root
  • run the following command
    robocopy C:\TEMP [DFSR folder path] /MIR
  • remove both TEMP and DFSR folders, this time fortunately without the above error.
6) Remove the user that you're currently logged in from Security tab of System Volume Information folder Properties.
7) Enable the DFS Replication service and start it back. You're done. The DFS replication starts over again!
HPE Smart Array CLI commands on ESXi

source link


Show configuration
ESXi 5.5 -> /opt/hp/hpssacli/bin/hpssacli ctrl all show config
ESXi 6.5 -> /opt/smartstorageadmin/ssacli/bin/ssacli ctrl all show config
Controller status
ESXi 5.5 -> /opt/hp/hpssacli/bin/hpssacli ctrl all show status
ESXi 6.5 -> /opt/smartstorageadmin/ssacli/bin/ssacli ctrl all show status
Show detailed controller information for all controllers
ESXi 5.5 -> /opt/hp/hpssacli/bin/hpssacli ctrl all show detail
ESXi 6.5 -> /opt/smartstorageadmin/ssacli/bin/ssacli ctrl all show detail
Show detailed controller information for controller in slot 0
ESXi 5.5 -> /opt/hp/hpssacli/bin/hpssacli ctrl slot=0 show detail
ESXi 6.5 -> /opt/smartstorageadmin/ssacli/bin/ssacli ctrl slot=0 show detail
Rescan for New Devices
ESXi 5.5 -> /opt/hp/hpssacli/bin/hpssacli rescan
ESXi 6.5 -> /opt/smartstorageadmin/ssacli/bin/ssacli rescan
Physical disk status
ESXi 5.5 -> /opt/hp/hpssacli/bin/hpssacli ctrl slot=0 pd all show status
ESXi 6.5 -> /opt/smartstorageadmin/ssacli/bin/ssacli ctrl slot=0 pd all show status
Show detailed physical disk information
ESXi 5.5 -> /opt/hp/hpssacli/bin/hpssacli ctrl slot=0 pd all show detail
ESXi 6.5 -> /opt/smartstorageadmin/ssacli/bin/ssacli ctrl slot=0 pd all show detail
Logical disk status
ESXi 5.5 -> /opt/hp/hpssacli/bin/hpssacli ctrl slot=0 ld all show status
ESXi 6.5 -> /opt/smartstorageadmin/ssacli/bin/ssacli ctrl slot=0 ld all show status
View Detailed Logical Drive Status
ESXi 5.5 -> /opt/hp/hpssacli/bin/hpssacli ctrl slot=0 ld 2 show
ESXi 6.5 -> /opt/smartstorageadmin/ssacli/bin/ssacli ctrl slot=0 ld 2 show
Create New RAID 0 Logical Drive
ESXi 5.5 -> /opt/hp/hpssacli/bin/hpssacli ctrl slot=0 create type=ld drives=1I:1:2 raid=0
ESXi 6.5 -> /opt/smartstorageadmin/ssacli/bin/ssacli ctrl slot=0 create type=ld drives=1I:1:2 raid=0
Create New RAID 1 Logical Drive
ESXi 5.5 -> /opt/hp/hpssacli/bin/hpssacli ctrl slot=0 create type=ld drives=1I:1:1,1I:1:2 raid=1
ESXi 6.5 -> /opt/smartstorageadmin/ssacli/bin/ssacli ctrl slot=0 create type=ld drives=1I:1:1,1I:1:2 raid=1
Create New RAID 5 Logical Drive
ESXi 5.5 -> /opt/hp/hpssacli/bin/hpssacli ctrl slot=0 create type=ld drives=1I:1:1,1I:1:2,2I:1:6,2I:1:7,2I:1:8 raid=5
ESXi 6.5 -> /opt/smartstorageadmin/ssacli/bin/ssacli ctrl slot=0 create type=ld drives=1I:1:1,1I:1:2,2I:1:6,2I:1:7,2I:1:8 raid=5
Delete Logical Drive
ESXi 5.5 -> /opt/hp/hpssacli/bin/hpssacli ctrl slot=0 ld 2 delete
ESXi 6.5 -> /opt/smartstorageadmin/ssacli/bin/ssacli ctrl slot=0 ld 2 delete
Add New Physical Drive to Logical Volume
ESXi 5.5 -> /opt/hp/hpssacli/bin/hpssacli ctrl slot=0 ld 2 add drives=2I:1:6,2I:1:7
ESXi 6.5 -> /opt/smartstorageadmin/ssacli/bin/ssacli ctrl slot=0 ld 2 add drives=2I:1:6,2I:1:7
Add Spare Disks
ESXi 5.5 -> /opt/hp/hpssacli/bin/hpssacli ctrl slot=0 array all add spares=2I:1:6,2I:1:7
ESXi 6.5 -> /opt/smartstorageadmin/ssacli/bin/ssacli ctrl slot=0 array all add spares=2I:1:6,2I:1:7
Enable Drive Write Cache
ESXi 5.5 -> /opt/hp/hpssacli/bin/hpssacli ctrl slot=0 modify dwc=enable
ESXi 6.5 -> /opt/smartstorageadmin/ssacli/bin/ssacli ctrl slot=0 modify dwc=enable
Disable Drive Write Cache
ESXi 5.5 -> /opt/hp/hpssacli/bin/hpssacli ctrl slot=0 modify dwc=disable
ESXi 6.5 -> /opt/smartstorageadmin/ssacli/bin/ssacli ctrl slot=0 modify dwc=disable
Erase Physical Drive
ESXi 5.5 -> /opt/hp/hpssacli/bin/hpssacli ctrl slot=0 pd 2I:1:6 modify erase
ESXi 6.5 -> /opt/smartstorageadmin/ssacli/bin/ssacli ctrl slot=0 pd 2I:1:6 modify erase
Turn on Blink Physical Disk LED
ESXi 5.5 -> /opt/hp/hpssacli/bin/hpssacli ctrl slot=0 ld 2 modify led=on
ESXi 6.5 -> /opt/smartstorageadmin/ssacli/bin/ssacli ctrl slot=0 ld 2 modify led=on
Turn off Blink Physical Disk LED
ESXi 5.5 -> /opt/hp/hpssacli/bin/hpssacli ctrl slot=0 ld 2 modify led=off
ESXi 6.5 -> /opt/smartstorageadmin/ssacli/bin/ssacli ctrl slot=0 ld 2 modify led=off
Modify smart array cache read and write ratio (cacheratio=readratio/writeratio)
ESXi 5.5 -> /opt/hp/hpssacli/bin/hpssacli ctrl slot=0 modify cacheratio=100/0
ESXi 6.5 -> /opt/smartstorageadmin/ssacli/bin/ssacli ctrl slot=0 modify cacheratio=100/0
Enable smart array write cache when no battery is present (No-Battery Write Cache option)
ESXi 5.5 -> /opt/hp/hpssacli/bin/hpssacli ctrl slot=0 modify nbwc=enable
ESXi 6.5 -> /opt/smartstorageadmin/ssacli/bin/ssacli ctrl slot=0 modify nbwc=enable
Disable smart array cache for certain Logical Volume
ESXi 5.5 -> /opt/hp/hpssacli/bin/hpssacli ctrl slot=0 logicaldrive 1 modify arrayaccelerator=disable
ESXi 6.5 -> /opt/smartstorageadmin/ssacli/bin/ssacli ctrl slot=0 logicaldrive 1 modify arrayaccelerator=disable
Enable smart array cache for certain Logical Volume
ESXi 5.5 -> /opt/hp/hpssacli/bin/hpssacli ctrl slot=0 logicaldrive 1 modify arrayaccelerator=enable
ESXi 6.5 -> /opt/smartstorageadmin/ssacli/bin/ssacli ctrl slot=0 logicaldrive 1 modify arrayaccelerator=enable
Enable SSD Smart Path
ESXi 5.5 -> /opt/hp/hpssacli/bin/hpssacli ctrl slot=0 array a modify ssdsmartpath=enable
ESXi 6.5 -> /opt/smartstorageadmin/ssacli/bin/ssacli ctrl slot=0 array a modify ssdsmartpath=enable
Disable SSD Smart Path
ESXi 5.5 -> /opt/hp/hpssacli/bin/hpssacli ctrl slot=0 array a modify ssdsmartpath=disable
ESXi 6.5 -> /opt/smartstorageadmin/ssacli/bin/ssacli ctrl slot=0 array a modify ssdsmartpath=disable

Harden Windows 10 workstations and servers: Disable SMB v1

source link:

Server Message Block (SMB) is a foundational service that has been used for many years. This internet standard protocol enables Windows to share files, printers and serial ports. SMB is used over the internet on top of the TCP/IP protocol.
SMB v1 has been in use since Windows 95, and in 2019, it’s still often found and abused in networks. If you have SMB v1 enabled in your network, it can be used in blended attacks that might include ransomware and other malware. In a 2016 blog post, Ned Pyle lists the protections you lose when using SMB v1:
As Pyle points out, “The nasty bit is that no matter how you secure all these things, if your clients use SMB1, then a man-in-the-middle can tell your client to ignore all the above. “

How to detect and disable SMB v1

You can use various means to disable SMB v1 in your network. For example, you can use group policy to disable it with a registry key as noted in a 2017 blog post. In addition, you can follow the guidance in KB2696547 to detect if SMB v1 is still in use in your network and to gracefully disable it.
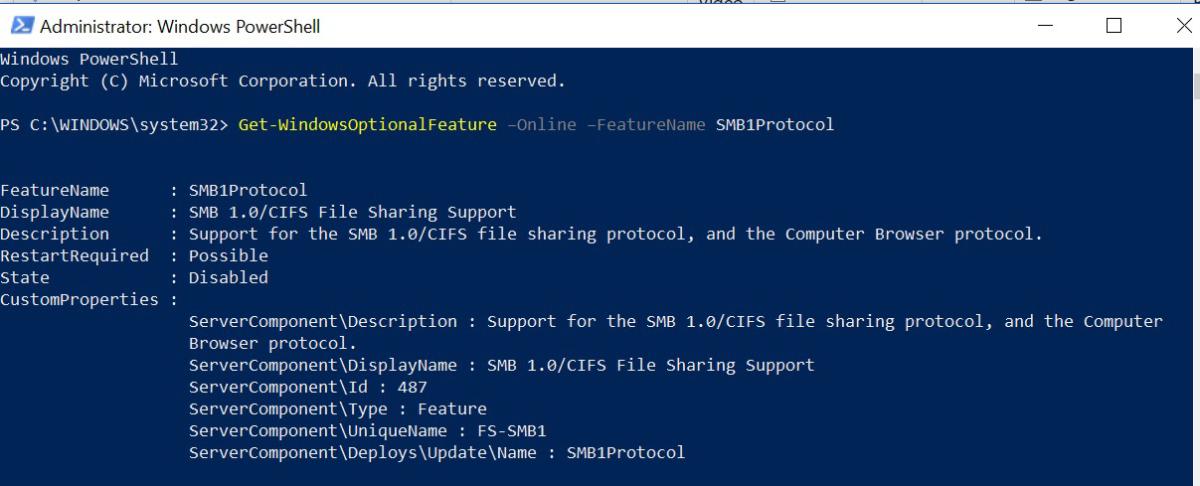
On Windows 10, you can use PowerShell to determine if SMB v1 is enabled on your computer. For example, the command Get-WindowsOptionalFeature –Online –FeatureName SMB1Protocol on my Windows 10 system provides the following information:
bradley smb 1 Microsoft
Determining support for SMB v1
You might find that older copiers and printers or older network-accessible storage still depends on SMB v1 to be functional. You need to determine if the risk of SMB v1 is acceptable, or you can contact the vendors on your impacting devices to determine if you can get a firmware update to support SMB v2 and SMB v3 on these older devices. There is even a list of products that demand SMB v1. If you are having issues disabling SMB v1 at home, check out the guidance on the Barbs Connected World blog.
Next, as recommended by the U.S. Cert, you can block SMB v1 at the firewall and internet. Most firewalls do this by default, but review if yours automatically blocks all SMB versions at the network boundary. It would do so by blocking TCP port 445 with related protocols on UDP ports 137-138 and TCP port 139.
Take the time now to review your SMB v1 status and tighten up your Server Message Block