How To Burn Chinese / Unicode Filenames Using Nero
"
One day your friend begs you to burn him your latest chinese mp3s that you converted.
You fire up your Nero, explored to your iTunes Music folder
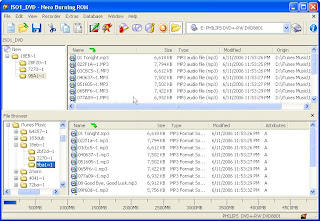
WTF? And you thought that it was in chinese, even your JPOP are not displayed correctly. You tried exploring to the folder and everything seems alright.
You need the AppLocale Utility by Microsoft
http://www.microsoft.com/globaldev/tools/apploc.mspx - Need validation
http://www.freefunfiles.com/software...e-utility.html - Alternate link for those who got troubles vaildating
Download, install, follow the instructions or just do your usual Next/I Agree/Next
Upon complete. Click Start>Microsoft Applocale>Applocale
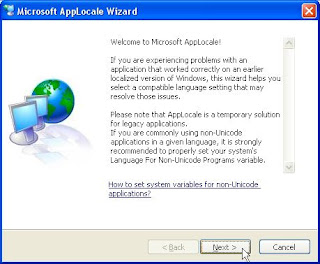
Click Next
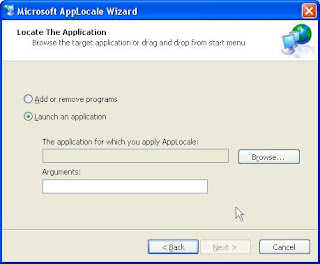
Drag & drop the shortcut, let's say "Nero Burning Rom". Drag & drop to the window. Alternatively, you can browse and explore to where Nero is located.
Click Next
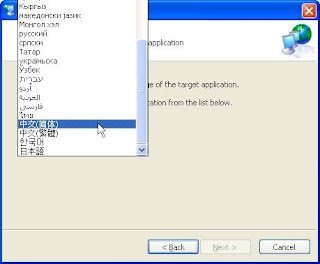
Select Chinese (Simplifed) or other languages. (Simplifed works well, I encounter problems selecting Traditional when I tried to burn with Nero, it will stuck at 1% for over 10mins, the cd hasn't been writen though)
Click Next
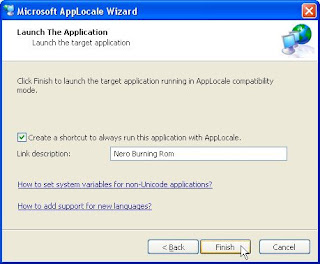
Check "Create a shortcut..." and enter the Link description if you want, the shortcut will be created under Start>Microsoft Applocale
Leave it uncheck if you want to run once without creating shorcut.
Click Finish.
Use the program as usual
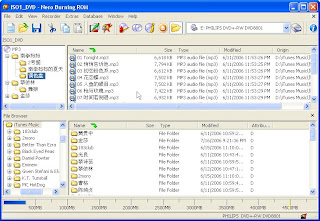
Now you can burn properly without messing up the filenames or renaming to hanyupinying or romanised languages.
This program can work with any burning software and any other programs or games where you have problem displaying non english characters without setting Chinese to your "Regional and Language Options" at your control panel.
VCB Selective Image Level Backup
Thanks JustinTurver from vmware communities for this great guide.
Link to Source
"
The default VCB scripts do not enable backup of a select disk or disks attached to a VM - vcbMounter.exe will snapshot and backup all disks attached to a VM unless a disk is placed in "Independent" mode meaning it cannot be placed in snapshot mode.
In many situations you may have a VM with a system disk (say 10GB) and an application or data disk (say 50GB) - and you only want to do a full-image backup of the system disk to (and maybe an incremental of the data disk).
This has always frustrated me so I set out to write a script to enable me to export specific VMDKs only.
A description of the process follows.
Attached, you will find a vb script that I have written to perfrom the process from your VCB proxy server. The VBScript takes 2 arguments as shown below:
cscript.exe export_select_disks.vbs
e.g.
cscript.exe *export_select_disks.vbs *DEVSQL01.domain.local scsi0.0,scsi0.1
You will need to modify the constants at the top of the script to suit your environment (default mount point, vcb proxy user and password, whether to delete any existing vcb snapshot for the VM etc).
Hope this helps someone!
(if you have trouble reading the below - see attached word doc)
====================================================
FULL IMAGE BACKUP OF INDIVIDUAL DISK USING VCB:
====================================================
NOTE: to create a usable script that implements the following process, will need to be able to feed in relevant command line args to CommVault "Pre-backup" script:
* FQDN of VM to backup
* COMMA-SEPARATED LIST oF SCSI ID/s oF DISK/s to export (while ignoring other disks)
Process is as follows:
1. GET "VmId" OF VM:
=> vcbVmName -h
e.g.
vcbVmName -h myvcserver.domain.local -u vcbproxyuser -p vcbproxypass -s ipaddr:vcbtest2.domain.local
Output (+note VM ID in bold+):
Found VM:
moref:vm-14168
name:VCBTEST2
uuid:5026fe86-c802-f99d-b1db-f3d6e9a5e732
ipaddr:10.96.64.136
2. CREATE SNAPSHOT (RETURNS SNAPSHOT ID FOR USE IN SUBSEQUENT COMMANDS):
SYNTAX: vcbSnapshot -h
=> vcbSnapshot -h myvcserver.domain.local -u vcbproxyuser -p vcbproxypass -c moref:vm-14168 VCB-BACKUP
Output (+note snapshot ID in bold+):
--2007-10-03 19:06:27.901 'CreateSnapshot' 4316 info-- Creating snapshot
SsId:snapshot-14259
3. GET LIST OF DISKS IN SNAPSHOT (I.E. ENABLES IDENTIFICATION OF DISK/s TO EXPORT & BACK UP):
=> vcbSnapshot -h myvcserver.domain.local -u vcbproxyuser -p vcbproxypass -l moref:vm-14168 SsId:snapshot-14259
(NOTE: "ssid" and "vmid" values comes from output of previous commands)
Output (note SCSI IDs in bold):
scsi0.0:DEVSANNET08 VCBTEST2/VCBTEST2_1.vmdk
scsi0.1:DEVSANNET08 VCBTEST2/VCBTEST2.vmdk
vmx:DEVSANNET08 VCBTEST2/VCBTEST2.vmx
logdir:DEVSANNET08 VCBTEST2/
suspenddir:DEVSANNET08 VCBTEST2/
config0:VCBTEST2.vmsd
config1:VCBTEST2.vmxf
config2:VCBTEST2.nvram
log0:vmware-7.log
log1:vmware-8.log
log2:vmware-9.log
log3:vmware-10.log
log4:vmware-5.log
log5:vmware-6.log
log6:vmware.log
4. EXPORT THE DESIRED VIRTUAL DISK/s (SCRIPT GETS DISK PATH FROM OUTPUT OF PREVIOUS COMMAND):
cd D:\mnt
md VCBTEST2.emapdev.net-CustomDiskBackup
SYNTAX: vcbExport -M 1 -d VCBTEST2_1.vmdk -s "blklst://
NOTE: sytax must be precise!
E.G.:
=> vcbExport -M 1 -d D:\mnt\VCBTEST2_1.vmdk -s "blklst://snapshot-14259DEVSANNET08 VCBTEST2/VCBTEST2_1.vmdk@lonman01.emap.net? vcbproxyuser/vcbproxypass"
Output (over SAN not NIC):
Converting "D:\mnt\VCBTEST2_1.vmdk" (compact file):
0%=====================50%=====================100%
**********************************************************************************
Does block-level export in consolidated format to a single .VMDK file.
Repeat for additional disks
5. POST-DISK-EXPORT COMMAND - COMMIT SNAPSHOT AS PER NORMAL vcbMounter POST-EXPORT PROCESS:
SYNTAX: vcbSnapshot -h
E.G.
=> vcbSnapshot -h myvcserver.domain.local -u vcbproxyuser -p vcbproxypass -d moref:*vm-14168 *SsId:snapshot-14259
Then run commands to delete local temp directory holding previously exported vmdk's
_6. SAMPLE COMMAND LINE FOR COMMVAULT PRE_BACKUP SCRIPT:_
SYNTAX: cscript.exe export_select_disks.vbs
E.G. (this is what we would specify in "Pre-scan" command line of our backup software (CommVault in our case)):
cscript.exe export_select_disks.vbs DEVSQL01.domain.local scsi0.0,scsi0.1
(this will back up VM disks SCSI(0:0) and SCSI(0:1) on the VM - each to a consolidated .vmdk file)
7. MOUNTING A DISK EXPORTED (BACKED UP) USING vcbExport (LOTS OF OPTIONS - THIS IS ONLY AN EG OF SYNTAX):
(Use for file extraction or as quick test of backup integrity)
SYNTAX: mountvm -cycleId -d
E.G.
=> mountvm -cycleId -d D:\mnt\DEVSQL01_DISK_SCSI_0.1.vmdk D:\mnt\temp
Unmount:
SYNTAX: mountvm -u
=> mountvm -u D:\mnt\temp
8. HOW TO RESTORE A DISK EXPORTED (BACKED UP) USING vcbExport:
Provided "-M 1" option is used during vcbExport backup, then restore is simple process:
* Copy the VMDK to a temp drive on the target ESX server
* Import the vmdk file: vmkfstools -i
(NOTE: This will expand the disk to it's original size!)
* Now just add the virtual disk to either a new VM, or to original VM (at same SCSI BUS ID as per original disk you are replacing)
See attached files and comments in the VB Script file
Link to the file
"
Exchange 2007 Management Tools Installation Guide
Link to Source
"
1. Download 32 Bit Microsoft Exchange 2007 installation files:
Exchange Server 2007 - Evaluation Software
http://www.microsoft.com/downloads/details.aspx?FamilyId=444C259E-605F-4A82-96D5-A2F448C9D4FF&displaylang=en
2. Extract the installation file.
3. Install the following pre-requirements components:
a. Microsoft .NET Framework Version 2.0
http://www.microsoft.com/downloads/details.aspx?FamilyID=0856eacb-4362-4b0d-8edd-aab15c5e04f5&displaylang=en
and the hotfix:
Microsoft .NET Framework Update Required
http://www.microsoft.com/technet/prodtechnol/exchange/Analyzer/729d1648-ff17-43f9-a1cf-4285a82d4917.mspx?mfr=true
b. Microsoft Management Console (MMC) 3.0
Microsoft Management Console 3.0 for Windows XP (KB907265)
http://www.microsoft.com/downloads/details.aspx?familyid=61FC1C66-06F2-463C-82A2-CF20902FFAE0&displaylang=en
Microsoft Management Console 3.0 for Windows Server 2003 (KB907265)
http://www.microsoft.com/downloads/details.aspx?familyid=4C84F80B-908D-4B5D-8AA8-27B962566D9F&displaylang=en
c. Windows PowerShell
Windows PowerShell 1.0 English-Language Installation Package for Windows XP (KB926139)
http://www.microsoft.com/downloads/details.aspx?familyid=6CCB7E0D-8F1D-4B97-A397-47BCC8BA3806&displaylang=en
Windows PowerShell 1.0 English-Language Installation Package for Windows Server 2003 (KB926139)
http://www.microsoft.com/downloads/details.aspx?familyid=10EE29AF-7C3A-4057-8367-C9C1DAB6E2BF&displaylang=en
4. Run "setup.exe" from the root of the folder from stage 2 on Windows Server 2003 SP1 (Standard or Enterprise Editions),
Windows Server 2003 R2 (Standard or Enterprise Editions), or Windows XP Professional SP2.
5. Press on "Step 4: Install Microsoft Exchange".
6. Press on "Next" button.
7. Mark the checkbox "I accept the terms in the license agreement.".
8. Press on "Next" button.
9. Press on "Next" button.
10. Choose " Custom Exchange Server Installation"
11. Press on "Next" button.
12. Mark the checkbox "Management Tools".
13. Press on "Next" button.
14. Enter the Exchange Organization name (if it didn’t auto completed by the installation wizard).
15. Press on "Next" button.
16. Press on "Finish" button.
"
List Of Common Windows Management Console
1) Microsoft Exchange Server 2007 Management Tools (32-Bit)
Brief Description
Exchange Server 2007 is a native 64-bit application that includes 64-bit management tools. You can use the management tools to administer your Exchange Server environment remotely. If the remote computer is running a 32-bit operating system, you will need to download the 32-bit management tools.
Download Link
2) Windows Server 2003 Service Pack 1 Administration Tools Pack
Brief Description
The Windows Server 2003 Service Pack 1 Administration Tools Pack (adminpak.msi) provides server management tools that allow administrators to remotely manage computers running Windows 2000 Server and Windows Server 2003 family operating systems. This is the Service Pack 1 version (build 5.2.3790.1830) of the adminpak.msi file.
Download Link
Delete Filename /Files Longer Than 255 Characters
Here's the solution.
1) Get into the Command Prompt.
2) Type "Dir /X" - displays the directories and files in short filename format
3) Type "rmdir /s /q {Path to the directories or files you want to del"
e.g. rmdir /s /q C:\ShortF~1
- This would delete the ShortF~1 directories including the sub-directories.
Do try this with caution! As you won't want to mistakenly delete any important stuff. :P
How To Shutdown / Restart A Windows PC Remotely?
Extracts from Microsoft TechNet
"
Shutdown
Allows you to shut down or restart a local or remote computer. Used without parameters, shutdown will logoff the current user.
Syntax
shutdown [{-l|-s|-r|-a}] [-f] [-m [\\ComputerName]] [-t xx] [-c "message"] [-d[u][p]:xx:yy]
Parameters-l : Logs off the current user, this is also the defualt. -m ComputerName takes precedence.
-s : Shuts down the local computer.
-r : Reboots after shutdown.
-a : Aborts shutdown. Ignores other parameters, except -l and ComputerName. You can only use -a during the time-out period.
-f : Forces running applications to close.
-m [ \\ ComputerName ] : Specifies the computer that you want to shut down.
-t xx : Sets the timer for system shutdown in xx seconds. The default is 20 seconds.
-c " message " : Specifies a message to be displayed in the Message area of the System Shutdown window. You can use a maximum of 127 characters. You must enclose the message in quotation marks.
-d [ u ][ p ] : xx : yy : Lists the reason code for the shutdown. The following table lists the different values.
Value | Description |
---|---|
u | Indicates a user code. |
p | Indicates a planned shutdown code. |
xx | Specifies the major reason code (0-255). |
yy | Specifies the minor reason code (0-65536). |
/? : Displays help at the command prompt.
Remarks-
If you indicate a major and minor reason code, you must first define these reason codes on each computer for which you plan to use the particular reason. If the reason codes are not defined on the target computer, Event Viewer cannot log the correct reason text.
To shut down \\MyServer in 60 seconds, force running applications to close, restart the computer after shutdown, indicate a user code, indicate that the shutdown is planned, log major reason code 125, and log minor reason code 1, type:
shutdown -r -f -m \\MyServer -t 60 -d up:125:1
"
How To Format Large External USB Hard Disk In FAT32?
This the the limitation set by microsoft for Windows XP. You can read more on it at this link.
FAT32 limitation on Windows XP
But isn't FAT32 maximum usable size set at 2TB? So how do we achieve that?
We will need to use a third party software such as a freeware SwissKnife from CompuApps.
Link to SwissKnife download
How To Create a User-Defined Service Part 2
Article Extract from Tackteck.com
"
The Windows NT/2000 Resource Kit provides two utilities that allow you to create a Windows user-defined service for Windows applications and some 16-bit applications (but not for batch files).
Whats needed for Windows NT/2000:
Instrsrv.exe installs and removes system services from Windows NT/2000
Srvany.exe allows any Windows application to run as a service.
You can download both files here srvany.zip
This zip includes three files. The two you need srvany.exe and instsrv.exe to install the services and also srvany.wri which documents everything you can do with the program.
Note: Make sure the Services Manager is closed while running the DOS commands.
You will need to put these files in a directory called reskit At a MS-DOS command prompt(Start | Run | "cmd.exe"), type the following command:
This creates the service in the Services manager and the registry keys to setup what program to run.
WARNING: Using Registry Editor incorrectly can cause serious problems that may require you to reinstall your operating system. Microsoft cannot guarantee that problems resulting from the incorrect use of Registry Editor can be solved. Use Registry Editor at your own risk.
Next navigate to this registry key.
HKEY_LOCAL_MACHINE\SYSTEM\CurrentControlSet\Services\service name
From the Edit menu, click Add Key and name it Parameters
Next from the Edit menu, click Add Value and type this information.
Value Name: Application
Data Type : REG_SZ
String :
Now you can start your service from the Service Manager
With this same program you can remove the service also. Just run this command from command prompt.
How To Create a User-Defined Service Part 1
Look no further, below is the guide extracted from Microsoft Knowledge Base.
Link to the Article Source
Link to the srvany.exe mentioned in the article
"
How To Create a User-Defined Service
Article ID | : | 137890 |
Last Review | : | February 20, 2007 |
Revision | : | 2.4 |
SUMMARY
The Windows NT Resource Kit provides two utilities that allow you to create a Windows NT user-defined service for Windows NT applications and some 16-bit applications (but not for batch files).
Instrsrv.exe installs and removes system services from Windows NT and Srvany.exe allows any Windows NT application to run as a service.
MORE INFORMATION
To create a Windows NT user-defined service, perform the following steps:
1. | At a MS-DOS command prompt(running CMD.EXE), type the following command: path\INSTSRV.EXE My Service path\SRVANY.EXE where path is the drive and directory of the Windows NT Resource Kit (i.e., C:\RESKIT) and My Service is the name of the service you are creating. Example: C:\Program Files\Resource Kit\Instsrv.exe Notepad C:\Program Files\Resource Kit\Srvany.exe NOTE: To verify that the service was created correctly, check the registry to verify that the ImagePath value under HKEY_LOCAL_MACHINE\SYSTEM\CurrentControlSet\Services\service name is set to point to SRVANY.EXE. If this is not set correctly, the service will stop shortly after it starts and return an Event ID 7000 "The service name failed to start."WARNING: Using Registry Editor incorrectly can cause serious problems that may require you to reinstall your operating system. Microsoft cannot guarantee that problems resulting from the incorrect use of Registry Editor can be solved. Use Registry Editor at your own risk. For information about how to edit the registry, view the "Changing Keys And Values" online Help topic or the "Add and Delete Information in the Registry" and "Edit Registry Data" online Help topics in Registry Editor. NOTE: You should back up the registry before you edit it. |
2. | Run Registry Editor (Regedt32.exe)and locate the following subkey: HKEY_LOCAL_MACHINE\SYSTEM\CurrentControlSet\Services\ |
3. | From the Edit menu, click Add Key. Type the following and click OK: Key Name: Parameters Class : |
4. | Select the Parameters key. |
5. | From the Edit menu, click Add Value. Type the following and click OK: Value Name: Application Data Type : REG_SZ String : where |
6. | Close Registry Editor. |
- From a MS-DOS command prompt, type the following:
NET START
- Use the Sc.exe utility from the Resource Kit. Type the following from a MS-DOS command prompt:
where
For more information on installing and removing a user-defined service, please see the Srvany.wri document provided with the Windows NT Resource Kit utilities (i.e., C:\Reskit\Srvany.wri). This document can also be found on the Windows NT Resource Kit CD in the Common\Config directory.
"
Use Command Line Parameters With Remote Desktop Connection
Link to the Source
"
Use command line parameters with Remote Desktop Connection
Instead of starting Remote Desktop Connection from the Start menu, you can start it from the search box in this version of Windows, from the Run dialog box, or from a command line. That way you can use additional command line parameters to control how Remote Desktop Connection looks or behaves.
To start Remote Desktop from the Run dialog box, follow these steps:
|
The following table lists the parameters you can use.
Command line syntax for Remote Desktop Connection
Syntax |
mstsc [ |
Command line parameters for Remote Desktop Connection
Parameter | Description | ||||||||||||||
/v: | Specifies the remote computer you want to connect to. | ||||||||||||||
/console | In this version of Remote Desktop Connection, if the Terminal Server role service is installed on the remote computer, mstsc /console will:
To connect to the console session of a remote computer with the Terminal Server role service installed, follow these steps:
You can also use the "/console" parameter to connect to a server running Windows Server 2003. | ||||||||||||||
/f | Starts Remote Desktop Connection in full-screen mode. | ||||||||||||||
/w: | Specifies the width of the Remote Desktop Connection window. | ||||||||||||||
/h: | Specifies the height of the Remote Desktop window. | ||||||||||||||
/public | Runs Remote Desktop Connection in public mode. | ||||||||||||||
/span | Matches the remote desktop width and height with the local virtual desktop, spanning across multiple monitors if necessary. To span across monitors, the monitors must all have the same height and be aligned side by side. | ||||||||||||||
/edit | Opens the specified .rdp connection file for editing. | ||||||||||||||
/migrate | Migrates older connection files that were created with Client Connection Manager to new .rdp connection files. | ||||||||||||||
/? | Lists these parameters. |
Open Source Alternative to Mecury SiteScope?
Nagios is a the answer. Personally, i have not try it yet but i will do it in a few weeks or so.
Do wait for the updates. :)